FlowiseAI: A Guide on Simplifying End-to-End LLM Workflows with Drag and Drop Interface
In the ever-evolving landscape of Large Language Model (LLM) technologies, the need for streamlined and user-friendly tools has never been more crucial. FlowiseAI, an open-source drag-and-drop UI tool, is revolutionizing the way LLM workflows are designed and implemented.
The traditional process of creating LLM workflow often requires extensive coding knowledge and manual configuration, posing considerable barriers to entry for many aspiring students, developers, and businesses. These manual and code-based tools, while powerful, demanded a steady learning curve and significant time investment.
This is where FlowiseAI comes in. It is a tool of simplicity and efficiency in the LLM arena. This tool stands out by offering an intuitive drag-and-drop interface, making the creation of complex LLM workflows as simple as arranging Lego blocks on a screen. This approach is not just about reducing the complexity; it’s a paradigm shift in accessibility and user experience.
Different from traditional methods that require in-depth programming knowledge, FlowiseAI opens the doors to people who need help understanding where to start, including those without a background in coding.
In this article, we will discover how FlowiseAI is the future of LLM workflow. We’ll explore its user-friendly interface, understand its functionalities and features, and build our very first AI Persona Chatbot in FlowiseAI.
For enthusiasts and learners, this guide promises a comprehensive understanding of how:
- FlowiseAI makes it easy to create LLM workflows.
- You can install and run FlowiseAI on localhost
- You can create an AI-powered Persona Chatbot without any prior coding knowledge or experience.
- It enables users to easily develop end-to-end LLM applications with its Marketplace, Templates, API Integrations, and other features
- You can find answers to the most frequently asked questions on FlowiseAI
Note: No coding experience is required to build LLM apps with FlowiseAI.
Dear readers,
I’ll share some resourceful AI tools, that are affordable yet impactful productivity tools. These are tools I personally use and recommend highly. I encourage you to explore and integrate them into your routines.
If you use my links to purchase any tool, both of us will be in benefit. You get a discount and I make a small comission that will helps me build my writing skills.
1. PARAPHRASING TOOL — QUILLBOT AI: I would highly recommend Quillbot to everyone, it is a cost-effective alternative to Grammarly (only $8.33 per month) and offers many features like paraphraser, summarizer, plagarism checker, and a lot more. I use it for almost every task at work, and it saves me a lot of time.”
Give their FREE TRIAL a try! It’s definitely worth checking out. ✍️
2. MAP YOUR IDEAS — MyMapAI turns your brainstorming into actionable, visually captivating maps and presentations with ease. Over 10,000 professionals and students have revolutionized the way they organize and present their ideas with MyMapAI.
Coming Back to Topic:
Index
- Understanding FlowiseAI’s Core Features
- Getting Started with FLowiseAI
- FlowiseAI UI Overview
- Building Your Own AI Persona Chatbot with FlowsieAI
- Summary
- What’s Next?
- FAQs
- Key Takeaways
Understanding FlowiseAI’s Core Features
Here are five end-to-end features that emphasize on practical usage of Flowise:
- Automated Workflow Optimization: Flowise offers automated optimization features that adjust workflows based on user input and feedback. This includes automatic scaling of resources during high-demand periods and real-time adjustments to improve efficiency and reduce operational costs.
Example: A small business could use this feature to manage resource allocation during peak and off-peak times without manual intervention. - Pre-built Templates for Industry-Specific Applications: The tool includes various pre-built templates tailored to different industries, such as finance, healthcare, or e-commerce. These templates provide a starting point for users to develop custom LLM applications, reducing the time and effort needed to build workflows from scratch.
Example: A small-scale healthcare provider who has a clinic could use a pre-built template to quickly set up a patient interaction model, customizing it to fit their specific needs and demands. - Cross-Platform Compatibility and API Integration: It is crucial to ensure the tool is compatible with various platforms and offers rich API integration features. Flowise allows users to seamlessly integrate LLM workflows into existing applications or services.
Example: An e-commerce website built on Shopify, for instance, could integrate Flowise to enhance its customer service chatbots, making them more responsive and intelligent to customers. - Comprehensive Monitoring and Reporting: Flowise provides detailed monitoring and reporting tools that enable users to track the performance of their LLM workflows. This feature includes analytics on usage patterns, model accuracy, and user engagement metrics.
Example: A content creator could use these tools to monitor how effectively their AI-generated content is engaging readers and adjust their content strategy accordingly. - User-Friendly Interface for Non-Technical Users: The tool’s user-friendly interface lowers the barrier to entry for using advanced LLM technologies, making it accessible to a broader audience, including students, marketers, content creators, and business analysts.
Getting Started with FLowiseAI
In this section, we will set up Flowise locally on our machines. Then, we will understand its UI components and features.
I. Pre-Requisites
Global Install: To install Flowise globally, you’ll need to ensure that you have the latest version of NodeJS installed on your machine. This is because Flowise is built to run on NodeJS, and having the latest version ensures that you have access to all of its latest features and updates.
You can download and install NodeJS from their official website, and in the next sections, the installation instructions will allow you to set up Flowise with ease.
Alternative Installation Options: Aside from the global installation, Flowise also offers installation options through Docker, including Docker Compose and Docker Image methods. Additionally, there’s a setup guide for developers who might need a more customized setup.
Each of these methods has its specific steps and requirements, which are detailed in the Flowise documentation. Visit Flowise documentation for detailed instructions on installation options.
Installing Flowise for Developers
For this guide, I recommend using the global install method of Flowise, as it is easy to get started. Once you have NodeJS installed, you can then proceed to set up Flowise locally.
II. Setup Flowise Locally
There are three steps before you can access the Flowise UI. Open your terminal or any command line tool and follow the steps.
Install Flowise Package: To install Flowise, run the below command with the argument -g:
npm install -g flowiseStart Flowise Instance: To start the localhost instance of Flowise using the Node package, run the below command:
npx flowise startIf you want to start the Flowise UI with a user account, run the below command with username and password:
npx flowise start — FLOWISE_USERNAME=user — FLOWISE_PASSWORD=1234`Note: Change the username and password with your login credentials.
Access Flowise UI: To open the UI dashboard of the Flowise app, use the localhost connection. The Flowise server is listening at port 3000. You can access UI at the below URL:
http://localhost:3000/FlowiseAI UI Overview
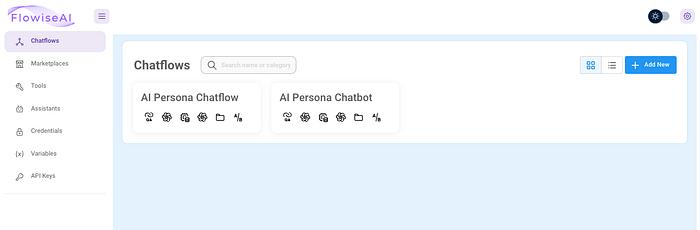
The Flowise dashboard leads to the Chatflows page where:
- Chatflows page shows previously created chat flows
- Add new chat flow using the “Add New” button
- Change between dark or light mode theme
- Navigate to settings and other features in Flowise
We will revisit the Chatflows page later to create our chat flow and build an LLM workflow without any coding experience.
Let’s take a look at the options that are currently available on the homepage.
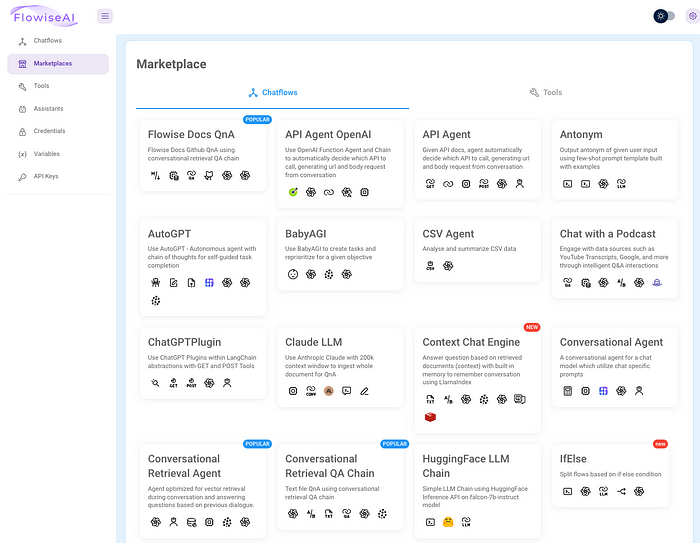
A. Marketplaces
You can find pre-built examples of chat flows created within Flowise on this page. Several chat flows and cool templates are available for users to use. You can modify any template to fit your workflow or use it as is.
Here are some templates to help you understand this feature in Flowise:
CSV Agent: Analyzes and summarizes a CSV file.
Conversational Retrieval Agent: This agent is optimized for vector retrieval during conversations and answers your questions based on previous dialogues.
ChatGPT Plugin: Allows the use of ChatGPT plugins within LangChain abstractions with GET and POST tools.
Flowsie Docs QnA: Allows for asking questions from a document using conversational retrieval QA chain.
Other Popular Templates: Some other useful and popular templates include Send Teams Message, Send Slack Message, Send Discord Message, Add Hubspot Contact, Get Current DateTime, Get Stock Mover, etc.
Note: FlowiseAI provides a wide range of customizable templates created by developers and the open-source community. Check out their Marketplaces page to find cool and useful templates that you can use directly or modify according to your needs.
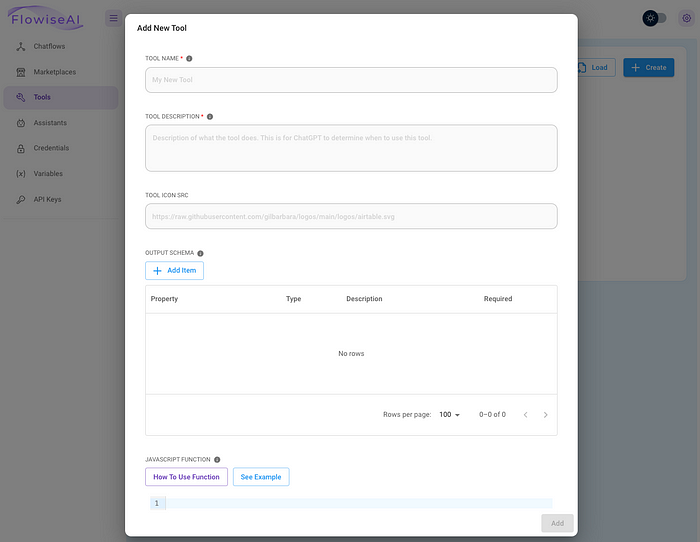
B. Tools
Agents can use tools to interact with the web, including generic utilities, other chains, or agents. The tools page allows you to create your program using some programming language or load your tools to be used in chat flows.
When adding a new tool, provide the tool name, description, output schema in JSON format, and a JavaScript function. The Javascript function executes when the tool is used. It can use properties such as variables from the output and schema.
Refer here for a list of tools that Flowise currently supports.
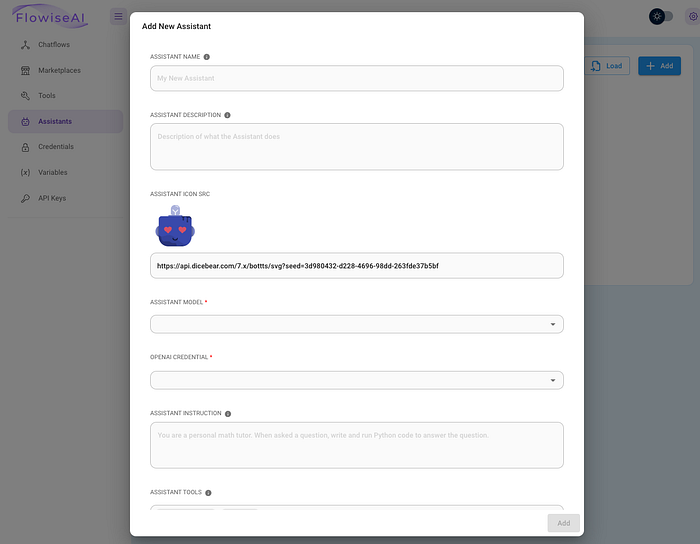
C. Assistants
You can now create a custom assistant and add it to your chat flows using LLM workflows.
Here are the detailed available options:
Assistant name: This is the name that will be used to identify the AI-powered assistant.
Description icon: This is the icon or image that will be used to represent the assistant.
Model: This refers to the artificial intelligence model that powers the assistant’s capabilities.
Credentials: This includes the login information and access rights for the assistant.
Instructions: This refers to the procedures (prompt) for using the assistant effectively.
Tools: These are the tools and features that are available to the user when interacting with the assistant.
Option to upload knowledge files: This is the ability to upload additional information or data to improve the assistant’s performance and knowledge.
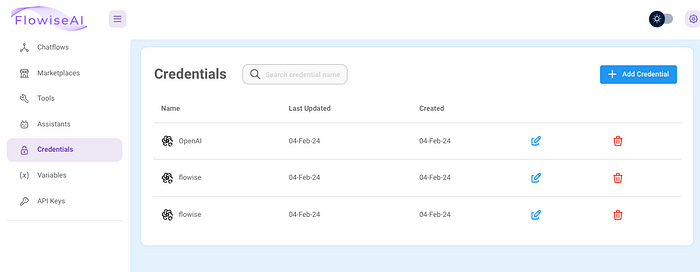
D. Credentials
On the credential page, you will find a search menu containing APIs of a variety of third-party applications like AWS, Cohere, Azure OpenAI, Confluence, GitHub, Figma, HuggingFace, Langsmith, MongoDB, Postgres, Redis, and a lot more.
These applications require you to provide certain login details, such as your access key, secret access, session key, and others. By inputting this information, you will be able to save your credentials for that app and use it directly within your chat flows.
This allows you to integrate multiple applications into your chat flows without needing to input your login details repeatedly.
E. Variables
On the Variables page, you can create variables by defining their type and values. Variables can be either Static or Runtime and can be used within your custom tool functions.
Assume you have a database URL that should not be exposed in the function, but you still want the function to be able to read the URL from an environment variable. In this case, you can define your variables and use them from your tools.
Users can create a variable and integrate the variable in the Custom Tool Function using below code:
$vars.<variable-name>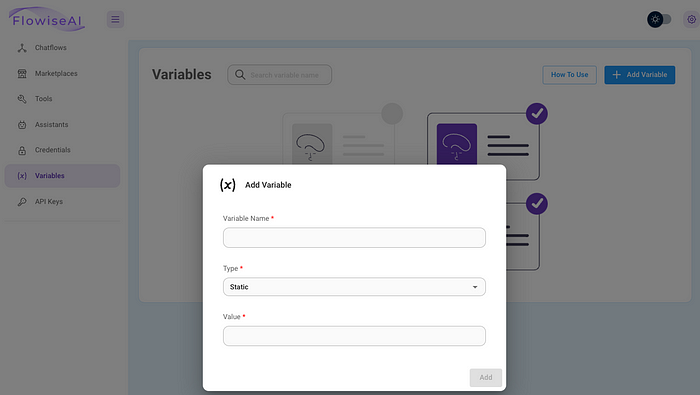
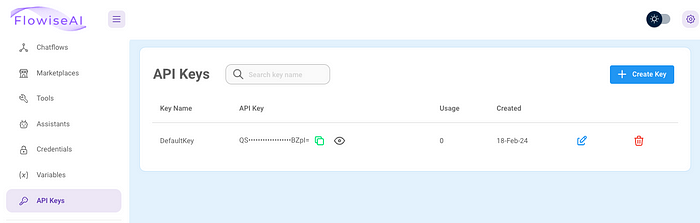
F. API Keys
With Flowise, you have the option to seamlessly integrate your models or chatflows with external applications by utilizing your API keys.
By accessing your API keys, you can connect with various third-party applications and services, providing you with greater flexibility and control over your workflows. You can use your API key if you need to pull data, automate tasks, or trigger events.
Building Your Own AI Persona Chatbot with FlowsieAI
Building your AI Persona Chatbot is one of the most searched projects in the Chatbot and AI domain, especially after the buzzing of openai and chatbots.
That is why today we are going to see how we can make our own AI Persona Chatbot with Flowsie without any prior coding experience.
In this guide, we will create a persona chatbot of Sam Altman (CEO of OpenAI) from a podcast of Lex Fridman on YouTube. We will then use the chatbot to ask Sam Altman about the future of AI and large language models for computer science students.
We will proceed step by step, and I will show you how you can create an AI persona chatbot using Flowise yourself.
Step 1: Prepare Data for Persona Chatbot
There are many ways you can source the data for your LLM model, like blogs, articles, or videos. For this guide, we will use this video on YouTube:
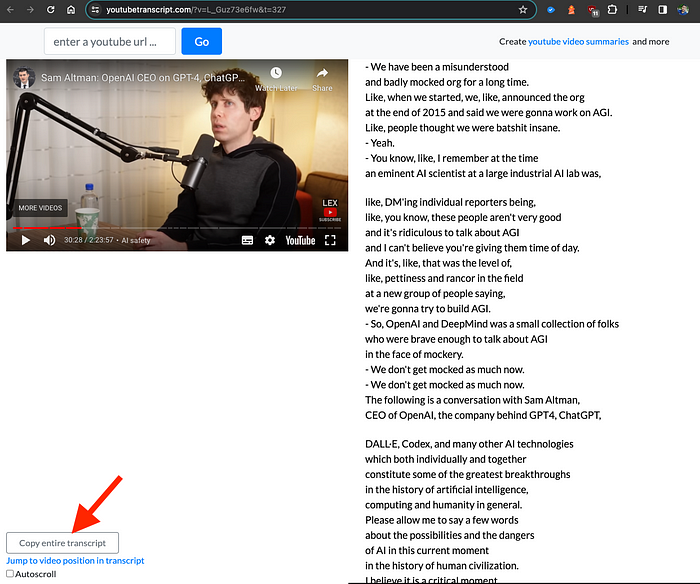
Sam Altman: OpenAI CEO on GPT-4, ChatGPT, and the Future of AI | Lex Fridman Podcast
You need to download the transcript of this video and then feed the transcript to the knowledge base of our chatbot.
To download the transcript of any YouTube video, copy the URL of that video and go to the YouTube Transcript website. Enter the YouTube URL here and click Go.
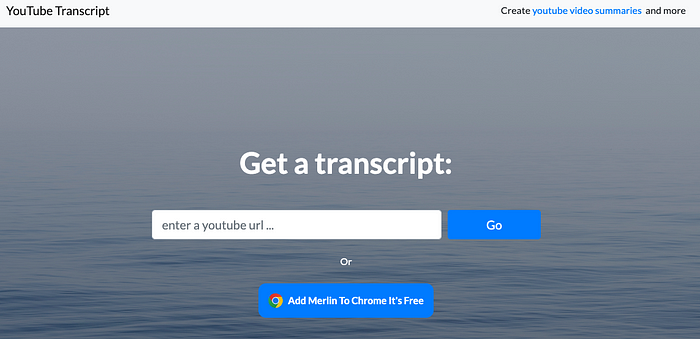
Click on Copy entire transcript and save it in a text file on your system locally. It is advised to save all the files that are going to be used as input inside a folder.
Note: You can feed as many inputs (articles, blogs, videos) into the knowledge base of your LLM model. Flowise also supports files in different formats like PDF, text, word, CSV, etc.
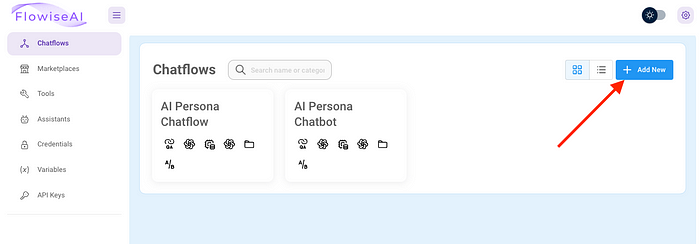
Step 2: Access FlowiseAI Chatflows
On the Flowise UI, navigate to Chatflows from the left pane and click + Add New to open the Flows canvas.
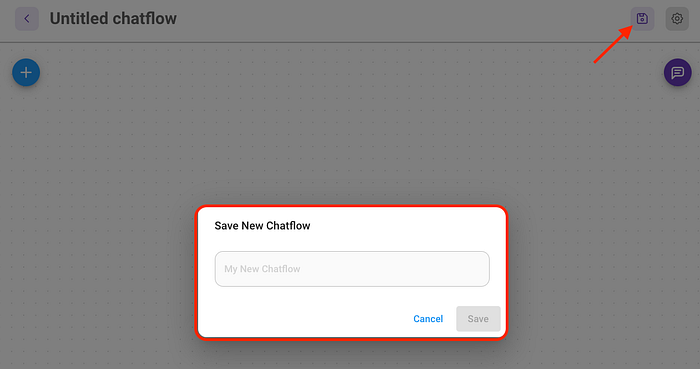
On the canvas, click the Save icon at the top right corner. The Save New Chatflow dialog box appears.
Give an identifiable name to your project chat flow and click Save.
Next, we need to add nodes onto the canvas that will allow us to chat with our AI model, which has access to the knowledge base.
Step 3: Add Conversational Retrieval QA Chain Node
The conversational retrieval QA chain is a node that is built on RetrievalQAChain to provide a chat history component to your application.
Click Add Nodes and go to Chains. Drag and drop the Conversational Retrieval QA Chain node onto the canvas.
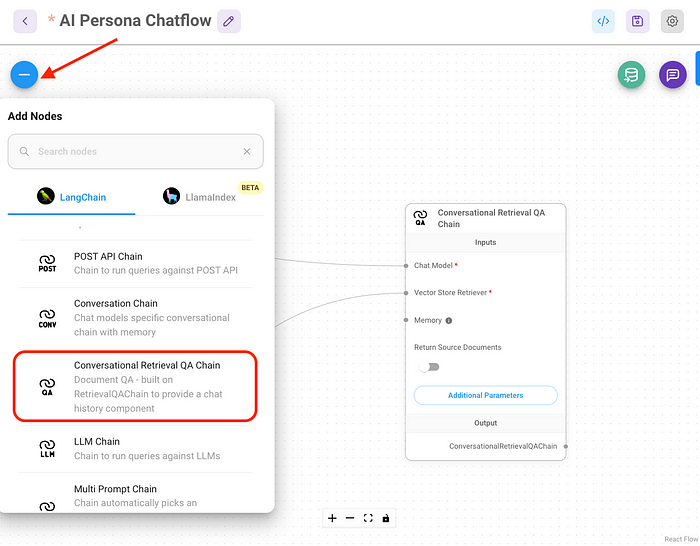
This Node takes the Chat Model, Vector Store Retriever, and Memory storage nodes as inputs.
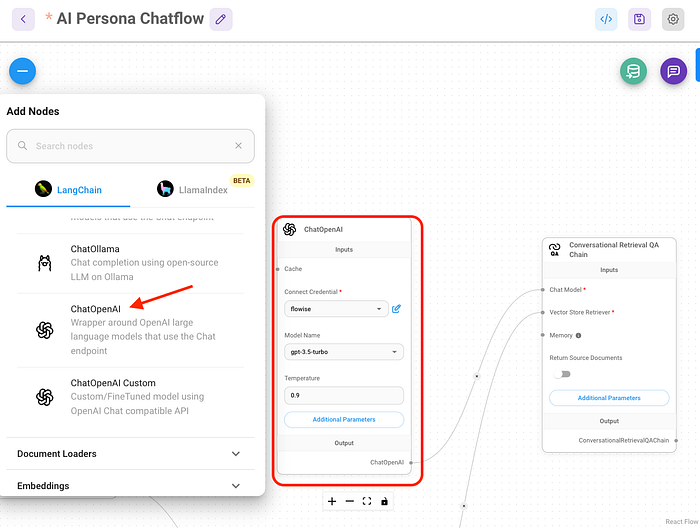
Step 4: Add ChatOpenAI Node
Next, we need to connect a Chat Model to our language chain. LangChain is a standard interface for interacting with multiple ChatModels rather than serving its own. To make it simple, this interface accepts a list of messages and outputs one.
Click Add Nodes and go to Chat Models. Drag and drop the ChatOpenAI node onto the canvas and wire it to the Chat Model input in the Conversational Retrieval QA Chain node.
This Node needs an openai API key to establish a connection with Flowise, the Model Name of different models of GPT, and a temperature value between 0–1.
For the OpenAI API key, we will be covering that as it is easy and outside the scope of this project. Still, all you need to do is visit (platform.openai.com/api-keys), click on Create New API Key, and copy and paste the generated secret Key in the Connect Credentials field.
Controlling the temperature setting of your gpt model can affect the level of creativity or randomness in the generated text.
Step 5: Add Vector Store Retriever Node
A vector store retriever is a module that retrieves vectors from a vector store based on user queries. It facilitates efficient vector retrieval and similarity search operations.
A vector store is a database, and the contents of our transcript files will be stored in this database. So when we interact with our chatbot, this chain will look up the information in this database.
Click Add Nodes and go to Vector Stores. Drag and drop the In-Memory Vector Store node onto the canvas and wire it to the Vector Store Retriever input of the Conversational Retrieval QA Chain node.
This Node asks for the Top K value, which is the number of top results this database will fetch. The default is set to 4.

Next, we need to add a Document and Embeddings node as input to the In-Memory Vector Store.
Step 6: Add OpenAI Embeddings Node
The document that goes as an input to the vector store first needs to be passed through the embeddings. Embeddings allow storing various data types (e.g. images, audio, text, documents) as vectors.
Click Add Node and go to Embeddings. Drag and drop the OpenAI Embeddings node on the canvas and wire it to the Embeddings input of the In-Memory Vector Store node.
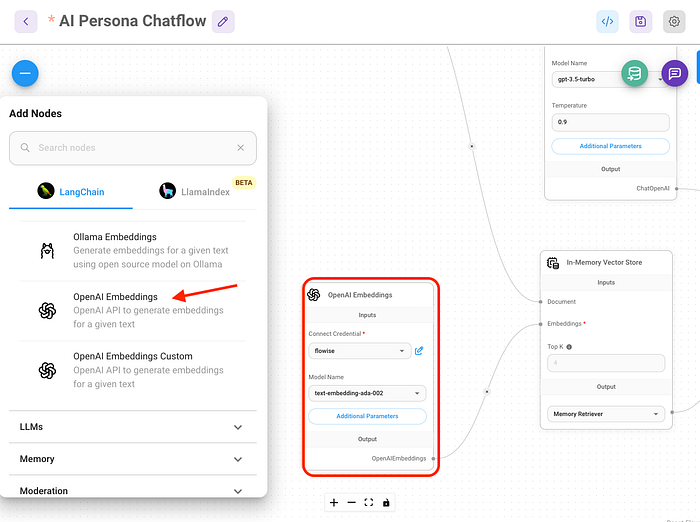
This Node provides an embedding model by Openai and hence requires API credentials for the connection. Use your OpenAI-generated Key here.
Step 7: Add Folder with Files Node
Now, we need a document loader that can take our documents as inputs and pass them to the LLM workflow for processing.
Click Add Node and go to Document Loaders. Drag and drop the Folder with the Files Node onto the canvas and wire it to the Document input of the In-Memory Vector Store node.
In the Folder Path field, specify the location of your transcript file from the YouTube video we downloaded in step 1.
For example: Users/Desktop/Folder_Name
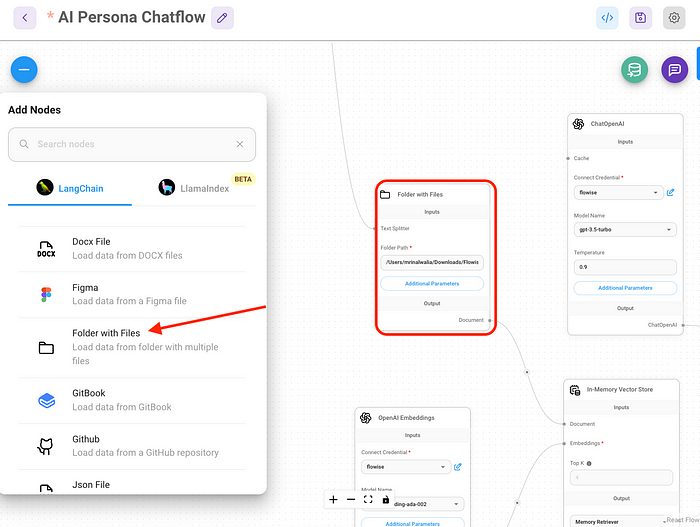
Note: You can specify any kind of document like PDF, docx, text, and more.
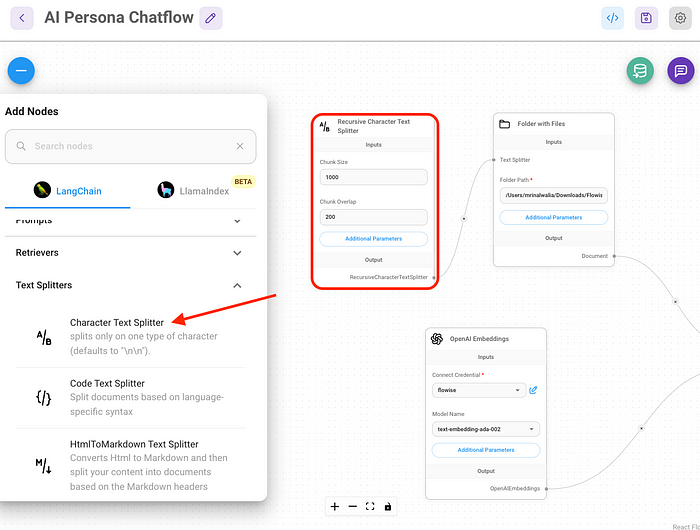
Step 8: Add Recursive Character Text Splitter
There is one last Node that needs to be connected to the Text Splitter input of the Folder with the Files node. This text splitter divides the input text from the file you upload into chunks of blocks that are easy to process by the LLM models.
Click Add Node and go to Text Splitters. Drag and drop the Recursive Character Text Splitter node onto the canvas and wire it to the Text Splitter input of the Folder with Files node.
You can specify the Chunk Size and Overlap fields with the desired length of each block of text.
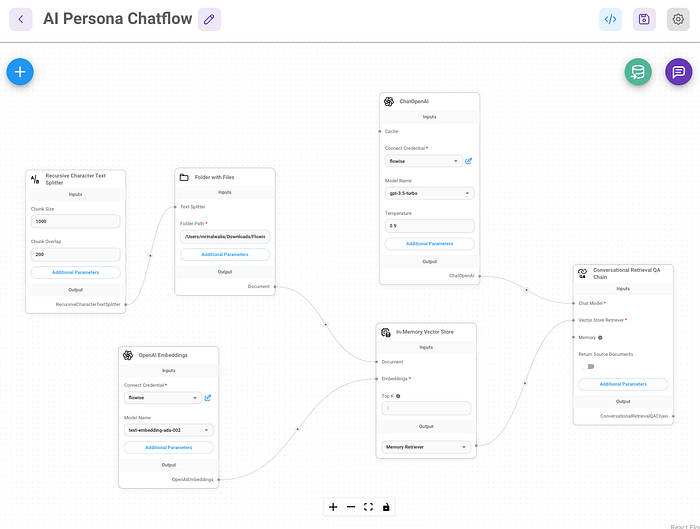
Step 9: Overview of The Chatflow Canvas
It was supposed to be easy, but it may look overwhelming at this point. This is your first time, and we understand that. Let’s have a look at our canvas and understand what is actually going on.
First, the document loader takes the input as a document and applies the text splitter function to it. Then, the contents of the document are passed on to the vector store, which uses the embedding model to prepare the data and store it back in vector stores.
Now, when we ask a question to the Conversational Retrieval QA Chain node, it looks for the answer in the vector store and returns its best response.
Click Save at the top right corner of the canvas to save your Chatflow.
Step 10: View the Results and Talk to AI Persona Chatbot
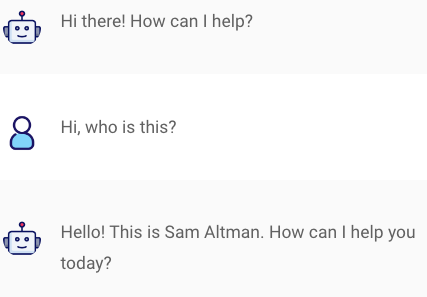
To be able to talk to your AI Persona Chatbot, click the chat icon at the top right corner and ask a simple question:
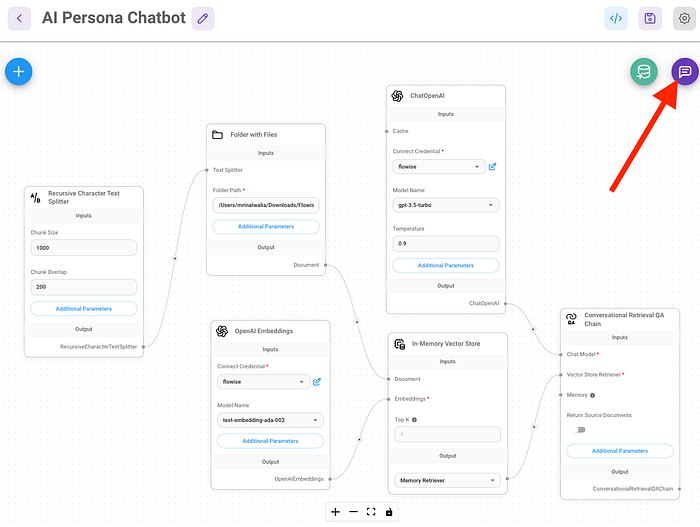
Question: “Hi, who is this?”
Chatbot Reply: Hello! This is Sam Altman. How can I help you today?
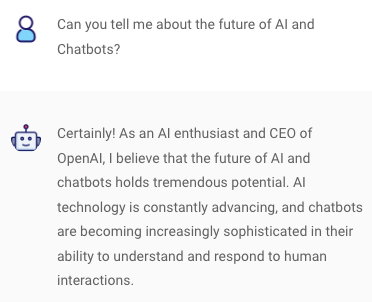
Question: Can you tell me about the future of AI and Chatbots?
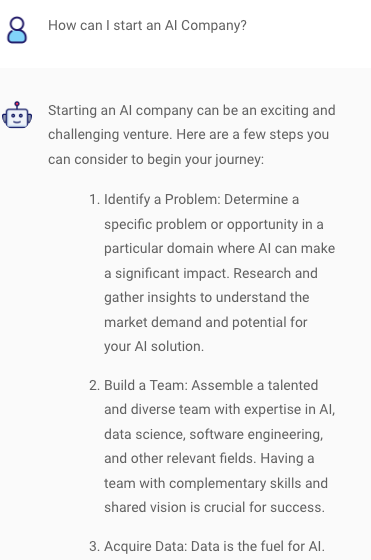
Question: How can I start an AI Company?
Summary
FlowiseAI is an open-source tool that simplifies the end-to-end Large Language Model (LLM) workflows, making it accessible to a broader audience, including students, marketers, content creators, and business analysts.
The tool offers various features such as Automated Workflow Optimization, Pre-built Templates for Industry-Specific Applications, Cross-Platform Compatibility and API Integration, Comprehensive Monitoring and Reporting, and User-Friendly Interface for Non-Technical Users.
FlowiseAI is a robust and versatile tool that enables users to implement, manage, and scale their LLM projects effectively. I personally see FlowiseAI as the future of LLM workflows, offering practical applications and scalability.
What’s next?
Everyone gets hands-on experience with the Flowise AI tool and builds their own LLM workflows or plays with the examples in this guide to build personalized AI personas chatbots. If you have any suggestions or ideas about how to use this tool, I would love to hear about them.
FAQs
Q1. What kind of workflows can be created using FlowiseAI?
Answer: FlowiseAI can be used to create a wide range of LLM workflows, including chatbots, sentiment analysis, text summarization, and more. The tool includes various pre-built templates tailored to different industries, such as finance, healthcare, or e-commerce, providing a starting point for users to develop custom LLM applications.
Q2. Is coding knowledge required to use FlowiseAI?
Answer: No, coding knowledge is not required to use FlowiseAI. The tool’s user-friendly interface lowers the barrier to entry for using advanced LLM technologies, making it accessible to a broader audience, including students, marketers, content creators, and business analysts.
Q3. How does FlowiseAI ensure the security of user data?
Answer: FlowiseAI is designed with security in mind and ensures the protection of user data through various measures. The tool uses secure protocols to encrypt data in transit and at rest, and users retain complete control over their data, including where it is stored and who has access to it.
Q4. Is FlowiseAI free?
Answer: FlowiseAI is an open-source and completely free tool. Anyone can download it and start using it by following this guide.
Key Takeaways
- FlowiseAI is an open-source drag-and-drop UI tool that simplifies the creation of Large Language Model (LLM) workflows, making them accessible to a broader audience.
- The tool offers an intuitive user interface, pre-built templates, cross-platform compatibility, and API integration, making it easy for users to develop end-to-end LLM applications.
- Automated workflow optimization, comprehensive monitoring and reporting, and a user-friendly interface are some of the key features of FlowiseAI.
- No coding experience is required to build LLM apps with FlowiseAI.
- FlowiseAI is an excellent tool for students, developers, and businesses looking to streamline their LLM workflows, save time and resources, and improve efficiency.
- With FlowiseAI, users can build their very first AI Persona Chatbot without any prior coding knowledge or experience.
- FlowiseAI is the future of LLM workflow and is constantly evolving to meet the changing needs of the industry.